Sump Pump Installation and Maintenance for Basement Flood Prevention
Reading time: 14 minutes
Picture this: It’s a rainy Tuesday night in April 2026, and your neighbor frantically calls you—water is bubbling up through their basement floor drain, creeping toward the furnace, the water heater, and decades of cherished family storage. The culprit? A failed sump pump that hadn’t been tested since it was installed six years ago. Meanwhile, your basement stays bone dry. The difference between those two outcomes isn’t luck—it’s preparation, installation quality, and consistent maintenance.
Basement flooding is not a fringe problem. According to the Insurance Institute for Business & Home Safety (IBHS), flooding-related water damage remains the second most common homeowner insurance claim in North America, with basement intrusion events costing an average of $4,200–$11,000 per incident in 2025. With climate volatility intensifying rainfall events across much of the U.S. and Canada, that figure is projected to climb another 15% by 2027.
A properly installed and maintained sump pump is one of the most cost-effective defenses a homeowner can invest in. This guide will walk you through everything you need to know—from understanding how sump systems work, to installation best practices, to a maintenance routine that keeps your pump ready when you need it most.
Table of Contents
- Understanding Sump Pumps: How They Work and Why They Matter
- Types of Sump Pumps: Choosing the Right System
- Sump Pump Installation: Step-by-Step Guidance
- Common Installation Challenges and How to Overcome Them
- Maintenance Routines That Prevent Failure
- Sump Pump Failure Causes: Data at a Glance
- Comparative Table: Sump Pump Types Side by Side
- Real-World Examples: Lessons from the Field
- Frequently Asked Questions
- Your Dry Basement Action Plan: Next Steps
Understanding Sump Pumps: How They Work and Why They Matter
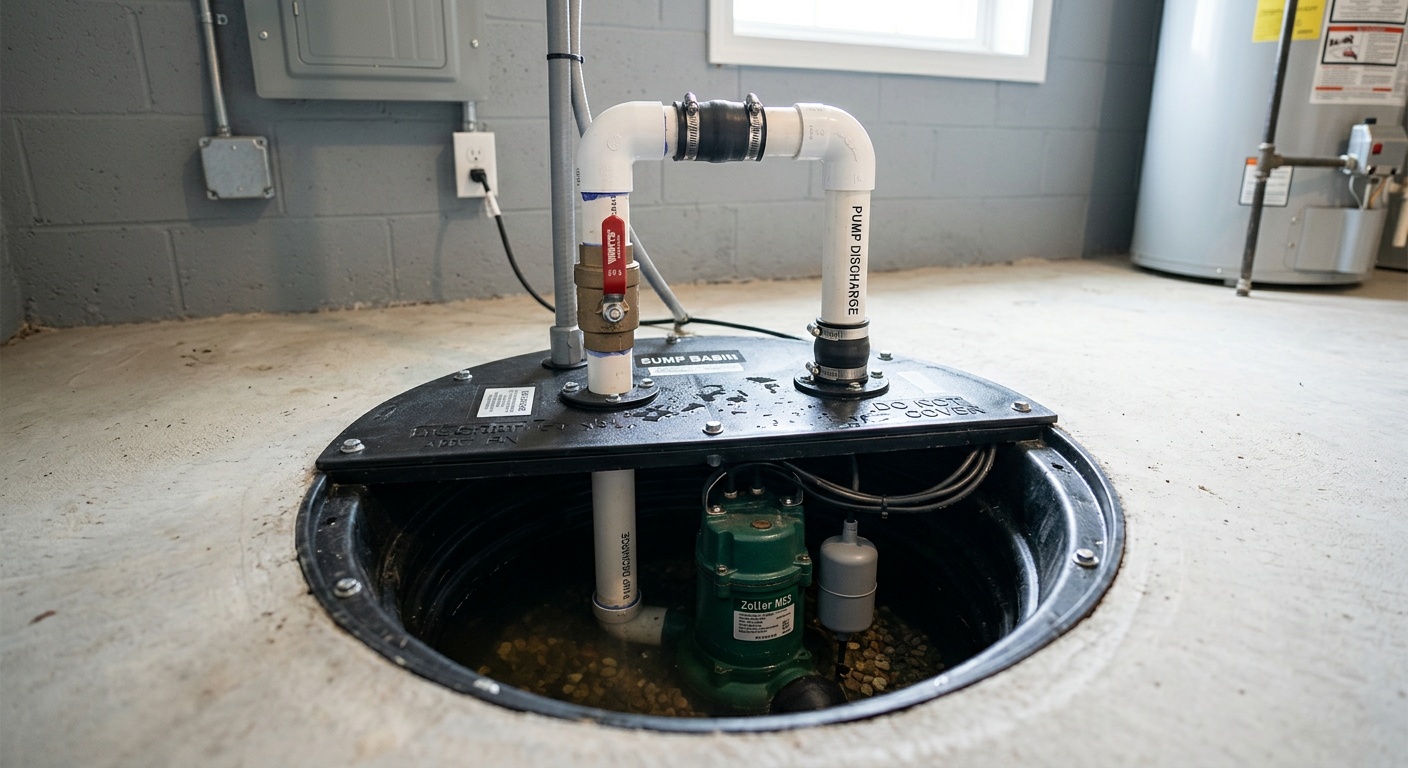
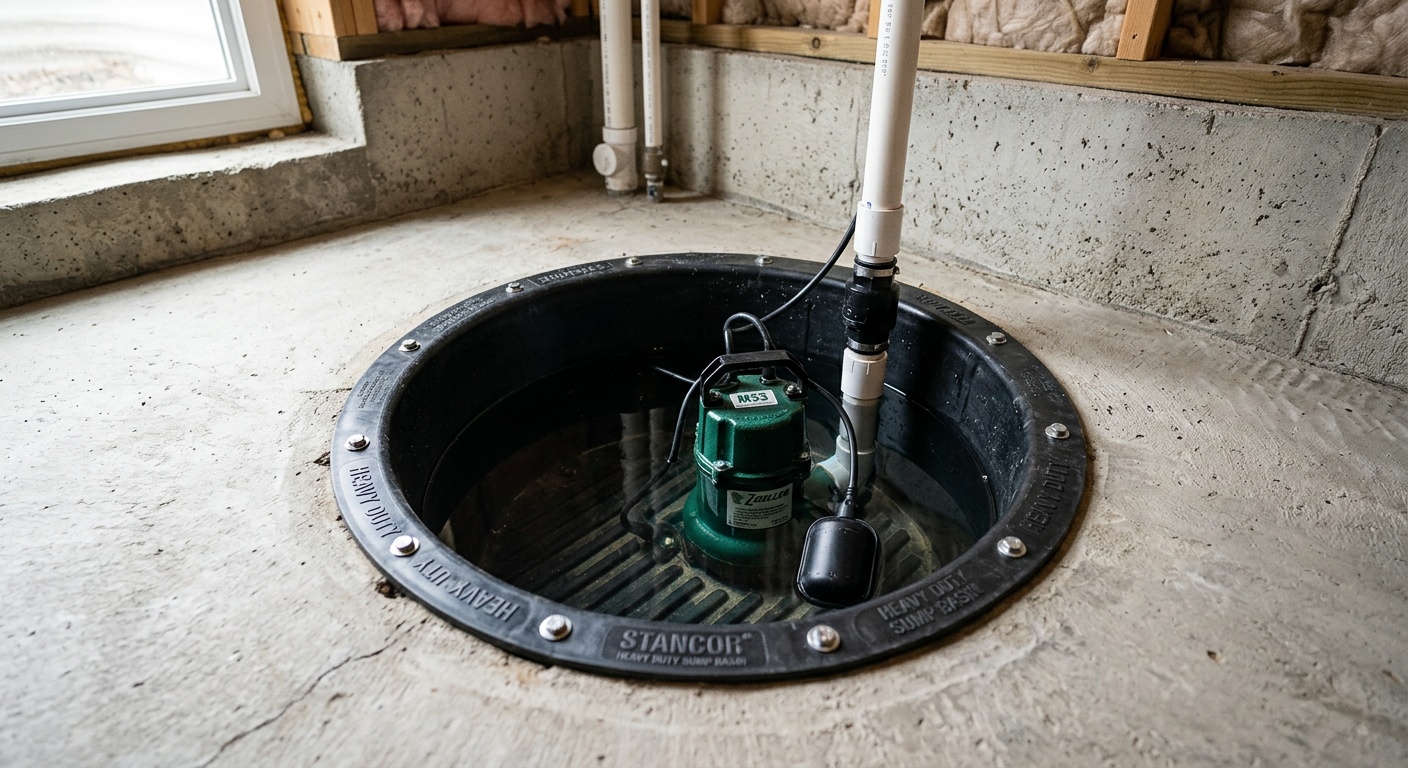
At its core, a sump pump is a motorized device installed in the lowest point of your basement or crawl space, housed inside a pit (the sump basin) dug into the floor. When groundwater levels rise—due to heavy rain, snowmelt, or high water tables—water flows into the pit through perforated walls or a drainage tile system. Once the water reaches a set float level, the pump activates and forces water through a discharge pipe that routes it away from the foundation, typically to a storm drain, dry well, or yard drainage area.
The elegance of the system is its simplicity: gravity brings water in, electricity pushes it out. But that simplicity masks the precision required for it to work reliably when you need it most—during intense, prolonged storms when power outages are also a real possibility.
Why Basements Flood in the First Place
Understanding the why behind basement flooding helps you design a better defense. Water intrudes through several pathways:
- Hydrostatic pressure: Saturated soil surrounding the foundation pushes water through cracks in walls and floors.
- Surface runoff: Improper grading or clogged gutters direct water toward the foundation rather than away from it.
- High water table: In low-lying or clay-heavy soil areas, the water table naturally sits close to the surface and rises quickly after rain.
- Sewer backup: Municipal systems overwhelmed by storm surges can push sewage backward into floor drains—a situation a sump pump alone cannot prevent (a backwater valve is also needed here).
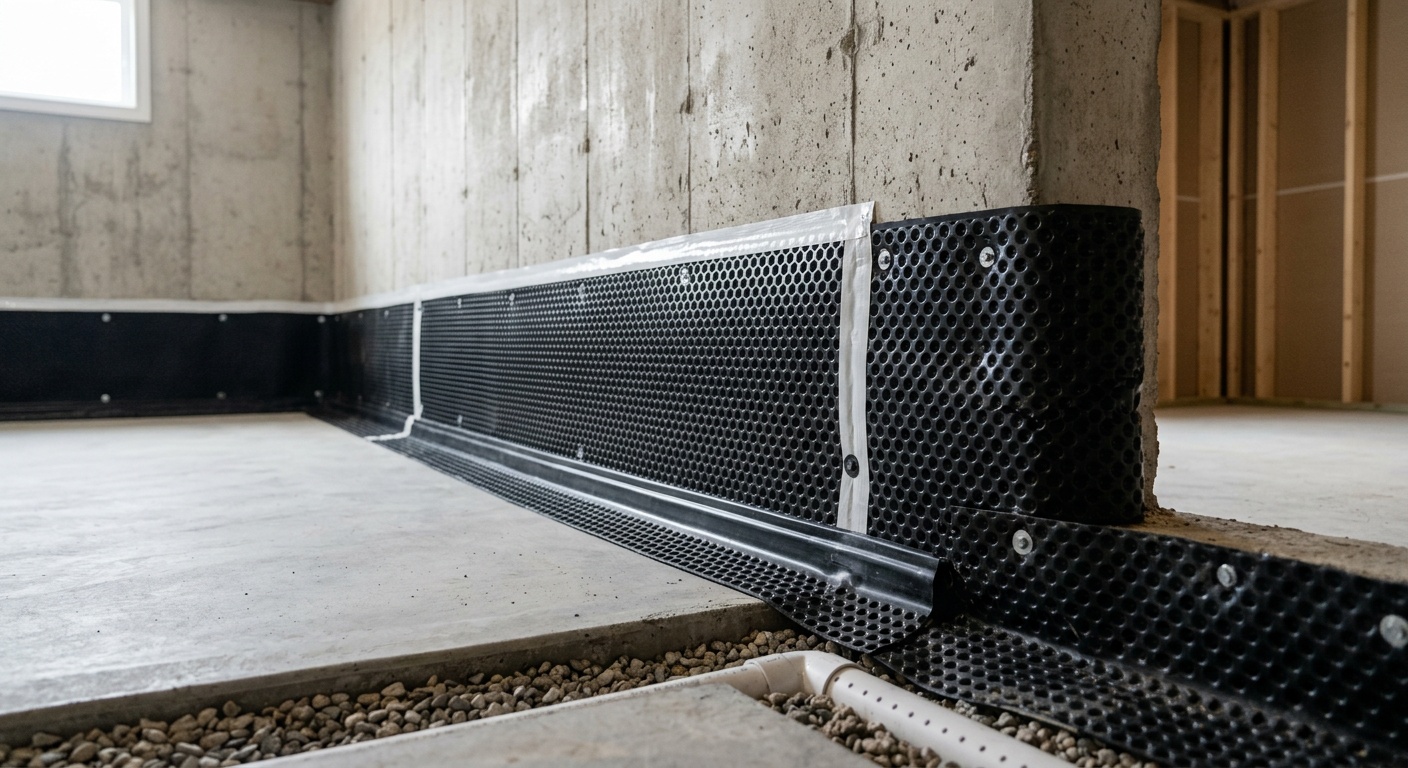
A sump pump directly addresses hydrostatic pressure and high water table issues. Combined with proper grading, gutter maintenance, and interior drainage systems, it forms a comprehensive flood-prevention strategy.
The Real Cost of Doing Nothing
Many homeowners delay sump pump installation because the upfront cost—typically $600–$2,500 installed depending on system complexity—feels significant. But compare that to the cost of one flood event. According to FEMA’s 2025 flood damage analysis, just one inch of water in a finished basement can cause up to $25,000 in damage when you factor in flooring, drywall, furniture, appliances, and mold remediation. Even in an unfinished basement, foundation repairs, HVAC damage, and structural drying costs regularly exceed $5,000. The return on investment for a quality sump pump system is measured in years, not decades.
Types of Sump Pumps: Choosing the Right System
Not every sump pump is right for every situation. The market in 2026 offers several distinct types, each with strengths, limitations, and ideal use cases.
Submersible vs. Pedestal Pumps
The two primary categories you’ll encounter are submersible pumps and pedestal pumps.
Submersible pumps sit entirely within the sump pit, submerged in water when active. Their motor is sealed to prevent water intrusion. They’re quieter, more powerful, and more visually discreet. They handle larger volumes of water effectively and are the preferred choice for most modern residential applications. Expect a lifespan of 7–15 years with proper maintenance.
Pedestal pumps position the motor on a shaft above the pit, with only the intake sitting in the water. They’re less expensive upfront, easier to access for servicing, and can last longer—up to 25 years—because the motor stays dry. However, they’re louder, less powerful, and less aesthetically pleasing. They’re well-suited for narrow pits where a submersible unit won’t fit.
Battery Backup and Water-Powered Backup Systems
Here’s the critical insight many homeowners miss: your worst flooding events and your most likely power outages occur simultaneously. A primary pump that loses power during a major storm is useless at the exact moment you need it most. This is why a backup system is not optional—it’s essential.
- Battery backup sump pumps: These activate automatically when the primary pump fails or loses power. Modern 2026 lithium-ion battery backup systems from brands like Zoeller and Liberty Pumps can run continuously for 8–12 hours on a full charge, handling thousands of gallons before depletion. Estimated cost: $200–$600 for the backup unit.
- Water-powered backup pumps: These use municipal water pressure to create suction and remove water—no electricity required. They’re infinitely reliable from a power standpoint but consume significant city water (approximately one gallon of city water per gallon pumped) and are not permitted in all municipalities. Best used in areas with reliable water pressure and where water cost is secondary to peace of mind.
- Combination systems: Premium units combine a primary submersible pump with an integrated battery backup in a single basin. These are increasingly popular in 2026 and offer seamless failover without requiring a second float trigger.
Sump Pump Installation: Step-by-Step Guidance
Installing a sump pump is a moderately complex DIY project that confident homeowners with basic plumbing and electrical skills can tackle. However, given the stakes, many choose to hire a licensed plumber or waterproofing contractor—particularly for the basin excavation and discharge line routing. Here’s the full picture of what the process involves.
Step 1: Assess Your Situation and Plan the Location
The sump pit should be placed at the lowest point of your basement floor, ideally near an exterior wall to minimize the discharge pipe run. If you have an existing pit, measure its diameter—most standard submersible pumps require a pit of at least 18 inches in diameter and 24 inches deep, though 24×36 inches is preferable for larger pumps and easier servicing. Check local building codes before beginning; many jurisdictions require permits for sump pump installation and have specific rules about discharge locations.
Step 2: Excavate and Install the Sump Basin
If you’re creating a new pit, this involves breaking through the concrete floor with a jackhammer, excavating to the required depth, and placing a pre-formed plastic or concrete sump liner. The liner should have perforations to allow groundwater entry. Surround the liner with gravel to facilitate drainage, then re-pour concrete around the top edge to create a flush, stable border. This is the most labor-intensive step and the primary reason many homeowners outsource it—labor for this phase alone can run $300–$700.
Step 3: Install the Pump and Float Switch
Lower the pump into the basin. For submersible models, connect the pump’s discharge outlet to a PVC pipe using a rubber coupling or threaded fitting. Install a check valve on the discharge line 12–18 inches above the pump—this critical component prevents water from flowing back into the pit when the pump shuts off, eliminating the annoying and damaging “short cycling” that wears out pump motors prematurely. Position the float switch so the pump activates when water reaches approximately 8–10 inches below the floor level, giving you buffer time and preventing the pump from running dry.
Step 4: Route the Discharge Line
The discharge line must carry water away from the foundation—a minimum of 10 feet in most cases, though 20+ feet is better. Route the pipe through the basement wall (or up through the floor if routing through a crawl space), seal the penetration with hydraulic cement or waterproof caulk, and ensure the exterior end of the pipe has a proper outlet that won’t freeze in winter. In cold climates, use a freeze-proof discharge line with an integrated relief hole that allows drainage even if the end cap freezes shut—a crucial 2026 upgrade that many older installations lack.
Step 5: Electrical Connection
Sump pumps should be plugged into a dedicated, ground fault circuit interrupter (GFCI)-protected outlet. This is non-negotiable for safety—combining electricity and water requires maximum protection. The outlet should be high on the wall, well above potential flood level. Never use an extension cord as a permanent solution. If your basement doesn’t have a suitable outlet near the pit, have a licensed electrician add one.
Common Installation Challenges and How to Overcome Them
Even experienced installers encounter obstacles. Here are the three most common challenges and practical solutions for each.
Challenge 1: Discharge line freezing. In climates where winter temperatures drop below freezing, the outdoor discharge line can ice over, causing water to back up into the basement—the exact opposite of the intended outcome. Solution: Install a freeze-protection discharge adapter (available from most hardware stores for under $15) that creates a small relief hole in the pipe. Even if the main outlet freezes, the pump can still discharge through this relief point rather than burning out the motor.
Challenge 2: Pump running continuously without emptying the pit. This usually indicates the pump is undersized for the water volume entering the pit, or that the discharge line is routing water back toward the foundation. Confirm your pump’s gallons per hour (GPH) rating matches your needs—a standard residential pump handles 2,000–3,000 GPH, but high-water-table areas may need 4,000+ GPH capacity. Also ensure the discharge outlet directs water at least 10 feet away and that the ground slopes away from the house.
Challenge 3: Noisy operation or vibration. Excessive noise often signals the pump is sitting on a hard concrete surface and vibrating. Place a rubber mat under the pump to dampen vibration. If the noise is a grinding or rattling sound, that may indicate debris in the impeller or a bearing failure—both require immediate attention to prevent motor burnout.
Maintenance Routines That Prevent Failure
The most common reason sump pumps fail isn’t mechanical defect—it’s neglect. A pump that sits dormant for months in a dry basement can seize up, have a stuck float switch, or develop a clogged intake screen without any warning signs until the next flood event. Here’s a maintenance schedule built around preventing exactly that scenario.
Monthly Quick Check (5 Minutes)
- Pour a bucket of water into the sump pit to trigger the float switch and confirm the pump activates and discharges water properly.
- Listen for unusual noises: grinding, rattling, or labored motor sounds.
- Visually inspect the pit for debris, sediment buildup, or standing water that isn’t draining.
Quarterly Maintenance (30 Minutes)
- Unplug the pump and remove it from the pit (for submersible models).
- Clean the intake screen with a garden hose to remove sediment and debris.
- Inspect the float switch for free movement—it should rise and fall without obstruction.
- Check the check valve for proper operation by ensuring water doesn’t flow backward when the pump stops.
- Inspect the discharge line for obstructions, especially after winter (leaves, dirt, animal nesting).
- Test battery backup systems by disconnecting primary power and verifying backup activation.
Annual Deep Service (1–2 Hours)
- Fully clean the sump pit of all sediment and debris.
- Inspect the pit liner for cracks or deterioration.
- Test the pump motor’s amperage draw with an inexpensive clamp meter—a significant increase in amp draw compared to manufacturer specs signals motor wear and approaching failure.
- Replace battery backup batteries on schedule (most sealed lead-acid batteries need replacement every 3–5 years; lithium-ion systems typically last 5–8 years).
- Review the pump’s age: if it’s approaching the 7–10 year mark, proactively price a replacement rather than waiting for a failure.
Pro Tip: Install a sump pump alarm—a simple, inexpensive float-based alarm ($15–$40) that sounds an alert when water in the pit rises above the normal operating range. Brands like Superior Pump and Wayne offer Wi-Fi-connected models in 2026 that send smartphone notifications, giving you early warning even when you’re away from home. This single addition has saved countless homeowners thousands of dollars in damage.
Sump Pump Failure Causes: Data at a Glance
Based on 2025 service data aggregated from waterproofing contractors across North America, here are the leading causes of sump pump failure at the time of a flooding event:
Source: North American Waterproofing Contractor Survey, 2025
The data delivers a clear message: 38% of failures are entirely preventable simply by having a battery backup system installed. Another 24% can be prevented through routine float switch testing. Together, these two accessible, low-cost measures eliminate nearly two-thirds of all pump failures during flooding events.
Comparative Table: Sump Pump Types Side by Side
| Feature | Submersible Pump | Pedestal Pump | Battery Backup | Water-Powered Backup |
|---|---|---|---|---|
| Average Cost (2026) | $150–$600 | $80–$200 | $200–$600 | $150–$350 |
| Typical Lifespan | 7–15 years | 15–25 years | 3–8 years (battery) | 10–15 years |
| Noise Level | Low (water-muffled) | Moderate–High | Low–Moderate | Low |
| Power Requirement | 120V AC outlet | 120V AC outlet | Charged battery | Municipal water pressure |
| Best Use Case | Most residential installs | Narrow pits, easy access | Backup for power outages | Power outage, no well water |
Real-World Examples: Lessons from the Field
Case Study 1: The Cleveland Homeowner Who Prepared Ahead of Time
In the spring of 2025, the greater Cleveland area experienced a series of rapid-cycle rain events that overwhelmed municipal drainage systems. Homeowner Marcus T., who had installed a submersible sump pump with a battery backup system two years earlier after a minor flooding incident, reported that his sump pump ran almost continuously for 36 hours during the peak event. Power in his neighborhood went out for approximately 11 hours during that period. His battery backup system seamlessly took over, and his basement remained completely dry.
His neighbor two doors down—who had an older pedestal pump with no backup and hadn’t tested it since 2022—experienced 4 inches of water in their unfinished basement. The bill for drying, concrete cleaning, and a new water heater (the original had been ruined) came to $8,400. Marcus’s total investment in his upgraded system? $1,100 including installation. The real-world ROI speaks for itself.
Case Study 2: The Crawl Space Challenge in Portland
A 1960s ranch-style home in Portland, Oregon presented a unique challenge in early 2026 when the owners, Sarah and David K., noticed seasonal standing water in their crawl space each winter. Their crawl space was only 22 inches high in the lowest areas, making a standard submersible pump impractical. A waterproofing contractor recommended a specialized low-profile crawl space sump pump—a submersible unit only 9 inches tall, designed specifically for tight spaces. Combined with a vapor barrier and a simple perimeter drain channel, the system eliminated the standing water problem entirely. Total project cost: $2,800. The owners noted that their HVAC system’s efficiency measurably improved afterward, likely because humid crawl space air was no longer infiltrating the living space and making the system work harder.
This case illustrates an important principle: the right pump for your situation isn’t always the biggest or most expensive—it’s the one properly matched to your specific geometry and water volume.
Frequently Asked Questions
How do I know if my sump pump is the right size for my basement?
Pump sizing is determined by two factors: the volume of water entering your pit during peak conditions and the total dynamic head (the vertical distance plus friction losses the pump must overcome to discharge water). For most residential basements with moderate groundwater, a pump rated at 1/3 to 1/2 horsepower—capable of moving 2,000–3,000 gallons per hour at 10 feet of head—is sufficient. If your pit fills faster than the pump can empty it during heavy rain, or if your discharge line runs more than 15 feet vertically, you may need a 3/4 HP or 1 HP model. When in doubt, consult a waterproofing contractor who can assess your water table conditions and recommend a properly sized unit. Oversizing has few downsides (slightly higher energy cost), but undersizing during a major flood event can be catastrophic.
Should I replace my sump pump proactively, or wait until it fails?
Proactive replacement is almost always the smarter choice—particularly as your pump approaches the 7–10 year mark. Unlike a failing dishwasher or refrigerator, a sump pump doesn’t usually give you convenient warning signs before it fails. It typically fails during the highest-stress event (a major storm), which is precisely when replacement isn’t possible and damage is most likely. If your pump is over 8 years old, runs frequently (more than a few times per week), makes new noises, or runs longer than usual to empty the pit, treat these as serious warning signs. Budget for replacement in your next 6–12 months rather than waiting for an emergency situation. A new pump costs $150–$600; emergency flooding damage remediation costs many times that amount.
Can I install a sump pump myself, or should I always hire a professional?
The honest answer is: it depends on your existing setup. If a sump pit already exists, the electrical outlet is already in place, and you simply need to replace an old pump with a new same-size model, this is a reasonable DIY project for a homeowner comfortable with basic plumbing. The job involves disconnecting the old pump, connecting the new one to the existing discharge pipe with a rubber coupling, adjusting the float switch, and testing the system—typically 1–2 hours of work. However, if you’re excavating a new pit, routing a new discharge line through a concrete wall, or installing a complete interior drainage system, hiring a licensed contractor is the right call. The excavation requires proper tools and expertise, and improper discharge routing can actually worsen your water problem. Get at least three quotes and ask for references for waterproofing projects specifically, not just general plumbing.
Your Dry Basement Action Plan: Next Steps
Basement flood prevention isn’t a single decision—it’s a system you build and maintain. As extreme weather events become more frequent in 2026 and beyond, homeowners who have invested in robust sump systems are consistently the ones who avoid the devastating costs and stress of flood damage. Here’s your clear roadmap forward:
- Step 1 – Assess your current situation this week: Does your basement have a sump pit? If yes, test your pump today with the bucket method. If no pit exists, get two or three quotes from waterproofing contractors for installation. Knowledge is your first line of defense.
- Step 2 – Add a backup system if you don’t have one: If your pump lacks a battery backup, this is the single highest-impact upgrade you can make. A $250–$400 investment eliminates the most common cause of pump failure during storm events.
- Step 3 – Install a smart alarm: A Wi-Fi-connected sump alarm gives you remote monitoring capability. Whether you’re at work or on vacation, you’ll know the moment water levels rise abnormally.
- Step 4 – Set a calendar maintenance reminder: Schedule your quarterly float switch test and your annual deep-clean service. Put it in your phone right now. Consistency is the entire game here.
- Step 5 – Review your homeowner’s insurance: Confirm whether your policy covers sump pump failure and what the coverage limits are. Many standard policies exclude sump failure—a separate water backup endorsement typically costs $50–$100 per year and is worth every cent.
“The best time to install a sump pump was before the last flood. The second-best time is today.” — A phrase repeated by virtually every waterproofing professional in the industry, and one that captures the entire philosophy of flood prevention.
As climate data continues to show increasing intensity of precipitation events across North America, the homeowners who will avoid five-figure repair bills are precisely those who treated flood prevention as infrastructure investment rather than optional expense. Your basement isn’t just storage space—it’s a foundational part of your home’s structural integrity and your family’s financial security.
So here’s the question worth sitting with: If a major storm arrived at your home tonight, are you confident your current system would protect you—or are you hoping for the best? Take one action from this roadmap today, and move from hoping to knowing.